Even if your computer is fast enough for handling a Windows product. Still you can move your head to android based operating systems.
The profit is that they eat less ram and works faster comparing to Windows. While it's sensible that it doesn't support .exe files and can't play HD videos. But if you're a geek, blogger or normal user. You can install android based operating systems.


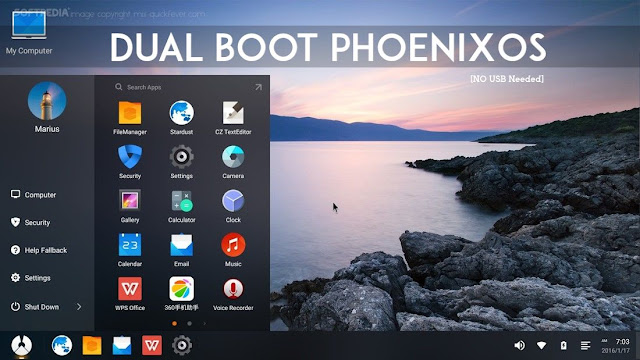
Phoenix Os delivers the same. A PC customized the android based operating system. This guide is dedicated to installing Phoenix Os on your hard drive and dual boot with Windows.
Things to keep in mind.
Phoenix Os can be run on desktops computer as well as laptops that support 32bit architecture.
If you looking for a 64 bit one remix os is for you.
If you looking for a 64 bit one remix os is for you.
- [message]
- REMIX OS 32-bit launched.( Better than Phoenix OS)
- Remix os 32-bit ( Dual Boot and Download Links)
So your old computer can run android based "Phoenix Os" as well as there are other operating systems for computers. if you looking for a android OS that support 64bit architecture machines download remix os as it was released on 12th jan 2016.
Things you will need -
Download Phoenix OS ZIP file. 370MB (skip if you already have)
Download initrd.img / Mirror 1 (Modified) 1MB
Download isolinux folder 200KB
Download initrd.img / Mirror 1 (Modified) 1MB
Download isolinux folder 200KB
(optional)
Download Bootice (to determine something)
Download USBmaker (Official Chinese language) / English Translated
Download Bootice (to determine something)
Download USBmaker (Official Chinese language) / English Translated
To install it on the hard disk you have two options.
1. On existing hard drive/local disk partition.
2. New partition on hard drive using partition manager.
2. New partition on hard drive using partition manager.
1) you can use any existing hard disk (other than main one, C://)
Or
Or
2) right click on my computer and choose manage tab. Go to disk management and look for a hard disk that has more than 10GB space.
Select that drive and right click and choose 'shrink volume' and put at least 8000 and click OK. It will make 8~ GB of unallocated free space. Click on that and choose to make a primary portion and proceed it.
You now just made a new disk partition dedicated to Phoenix Os.
Dual boot Phoenix Os with Windows
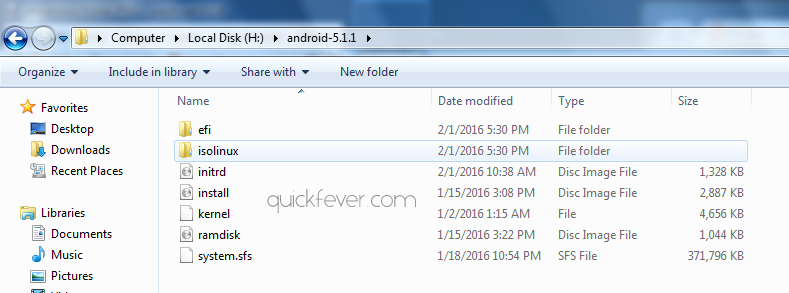
Step 1. Open Phoenix Os zip with WinRAR and extract all files to that that hard disk. And rename that folder to " android-5.1.1"
It should be like - Local disk/android-5.1.1
Fix 1. Replace the initrd.img file with the downloaded one. So Phoenix Os won't stuck on its logo.
Fix 2. Paste the isolinux folder inside "android-5.1.1". Make sure it will look like below image!!

Fix 2. Paste the isolinux folder inside "android-5.1.1". Make sure it will look like below image!!

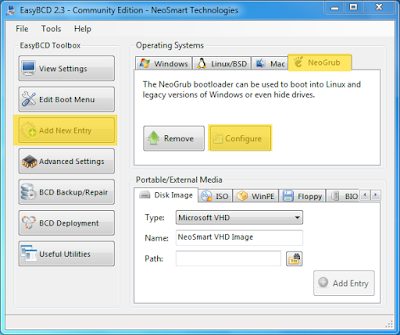
Install EasyBCD,
Open it and click "Add new entry" option and install the NeoGrub Bootloader on the NeoGrub tab.
Don't touch other settings such that drop-down asking for a hard disk. Let it default (c:/) otherwise, Phoenix Os will not load.


When the NeoGrub Bootloader it's installed, click on configure button. And paste this following code. and read on.
default=0
timeout=0
splashimage=/grub/android-x86.xpm.gz
root (hd0,1)
title Android 5.1.1
kernel /android-5.1.1/kernel quiet root=/dev/ram0 androidboot.hardware=android_x86 video=-16 SRC=/android-5.1.1
initrd /android-5.1.1/initrd.img
title Android 5.1.1 (video=LVDS-1:d)
kernel /android-5.1.1/kernel quiet video=LVDS-1:d root=/dev/ram0 androidboot.hardware=android_x86 video=-16 SRC=/android-5.1.1
initrd /android-5.1.1/initrd.img
Hold on, don't save it now.
- mind that line that says root (hd0,1)?
This actually tells bootloader where to look for the boot files.
You need to make edit to this according to your hard drive where Phoenix Os files are present
You need to make edit to this according to your hard drive where Phoenix Os files are present
In case that you have just only one HDD, just let it hd0.
And change '1' to drive number.
And change '1' to drive number.
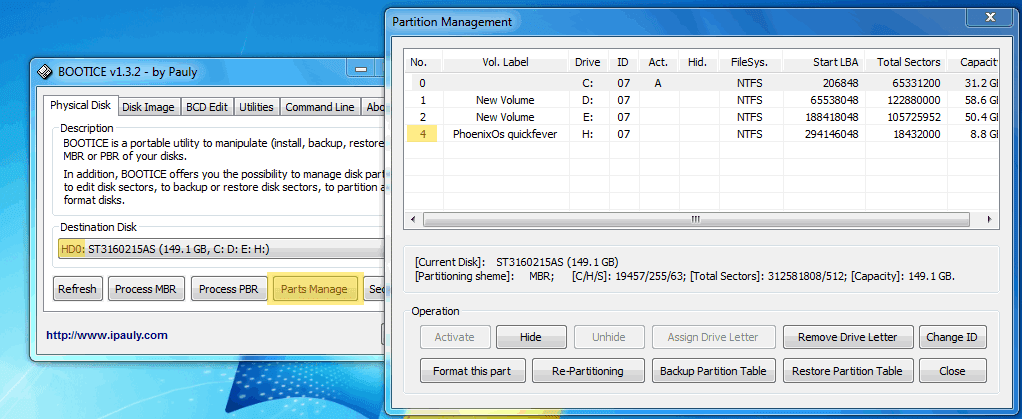
Example: I have 4 partitions, and my hard disk partition number, (where I loaded PhoenixOS files) is number 4 so, on the code pasted on NeoGrubs Bootloader, I will put root (hd0,4).
*/ How do I know what hd is my hard drive and which partition is the one with Phoenix? Use Bootice to know it.
Now, the partition: On Bootice, you will see there's a parts Manage button, so click it, and the number on the first vertical column will tell you which it's the number of the partition of PhoenixOS.
Once you have it open, you will see the Hard Drives are listed accord their number on the destination Disk drop down.

/*
Once you have it open, you will see the Hard Drives are listed accord their number on the destination Disk drop down.

/*
After changing the value save the file of NeoGrub Bootloader, and restart your computer.
optional - Default you will see a second option (when you restart your computer) "NeoGrub Bootloader" if you need to change this name Open EasyBsd > Advanced > Click NeoGrubBootloader > change its name to Phoenix Os.
optional - Default you will see a second option (when you restart your computer) "NeoGrub Bootloader" if you need to change this name Open EasyBsd > Advanced > Click NeoGrubBootloader > change its name to Phoenix Os.
You will be asked to boot windows or Phoenix Os. (2nd option can be with different name, don't mind that)
Choose second option and Phoenix Os will be booted.
On Phoenix Os, you can browse your other hard drives as well.
When you want to exit, click on power off or make a restart and boot into Windows and then shut down the computer.
When you want to exit, click on power off or make a restart and boot into Windows and then shut down the computer.
Conclusion.
Overall a nice operating system, don't just rely on Microsoft, taste the android operation system that powers up to 80% overall mobile devices.
Overall a nice operating system, don't just rely on Microsoft, taste the android operation system that powers up to 80% overall mobile devices.
Problems. (don't follow these)
I can boot the phoenix os from USB flash drive normally, but can't boot after I installed into the HDD. stuck at phoenix os logo. why this occurred?
I can boot the phoenix os from USB flash drive normally, but can't boot after I installed into the HDD. stuck at phoenix os logo. why this occurred?
just replace it to your partition where you install the phoenix os. it's the initrd.img from android x86 marshmallow.
Under the hood.
#1. Brad Linder stated a wrong sentence in his Phoenix Os review, which they will correct soon.
They stated Phoenix Os will save all the settings and manually installed apps. And after booting again, they will be available there.
They stated Phoenix Os will save all the settings and manually installed apps. And after booting again, they will be available there.
Wrong - in Phoenix Os, there is no saving mode, (like residence mode in Redmi os 2).
Tag :
Computer

0 Komentar untuk "[Guide] How To Dual Boot Phoenix Os with Windows 7 8 10 [NO USB NEEDED]"